Candy Cane Christmas Tree Decoration

Very simple knitted decoration for your tree or it could be sewn onto a stocking as decoration. You will need 2 double pointed needles and a small amount of red and white yarn, coloured ribbons if required. This can also be made using a knitting dolly or french knitting (I think thats what its called). Just make the tube of knitting the length you want and fasten off then shape as below.

This is simply an i-cord tube, shaped with a piece of wire or pipe  cleaner. I used 2 strands of double knit yarn held together and 5mm double point needles but you could use whatever yarn and needles you like, thinner needles or yarn will make the tube narrower and smaller which might work well if you want to sew it onto something as a decoration, you wouldnt need the wire then either, just sew it into shape. This candy cane is just over 4 inches in height.

If you havent done an i-cord before it is very simple and there is an excellent video at knittinghelp

Cast on 3 stitches in red.

Attach white yarn (if you do it now you can leave the end at the bottom of the piece of i-cord so it doesnt get in your way).

Knit 3 stitches in red.

Slide all stitches to end of needle, bring yarn round from last stitch firmly and knit again.

To ensure the yarn you are not currently using is carried up the middle of the tube, bring it over the left needle so it falls in front every time you slide the stitches to the end of the needle, then bring the yarn around the back of it to knit the next 3 stitches. Pull the yarn tight enough round the back so no hole is left. You are stretching the yarn round the back of the 3 stitches so you are knitting them in a circle.

To change colour twist the 2 yarns together and then start using the new colour, making sure the unused yarn is in front of the left needle.

Continue working 3 rows of each colour until you reach the desired length.

To finish off knit 3 together or if it is too tight slip 1, knit 2 tog then pass the slipped stitch over. Fasten off both yarns.

Shape the candy cane.

I used a piece of 0.8mm wire cut to the same length as the i-cord.

Using pliers grip the end of the wire and wrap it around the pliers to form a very small loop. This stops the end catching on the yarn.

Slip the wire through the yarn at one end of the i-cord so it slides through the middle of the tube and gently ease it all the way through.

Pipe cleaners can also be used and are probably better as they are less likely to slip out. However I didnt have any to hand so used wire and it feels fairly  secure. I WOULD NOT GIVE THIS TO  A SMALL CHILD AS A TOY! The end of the wire can be quite sharp, even pipe cleaners can be scratchy so please take care.

Bend the candy cane to the shape you want. Decorate with a ribbon bow if you like, sew a piece of thread through the top or tie the bow at the top and make a loop of ribbon to hang it from your tree.

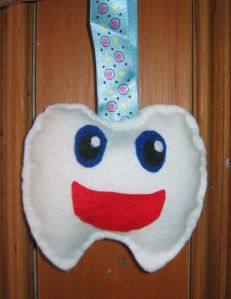
Tooth Fairy Door Hanger To Sew

I dont do much sewing but would like to. I do sometimes make things out of felt and this is one such creation.

My darling baby had to have 2 teeth taken out the other day <sob> and all he seemed bothered about was the tooth fairy bringing him some pennies. He wasnt anything like as upset as me (which is good, I think).

So rather than let the tooth fairy wake him up in the night rummaging under his pillow (he is the lightest sleeper ever) I made this to hang on the door knob. I hope you like it and it can bring a bit of happiness to other gappy individuals.

toothy

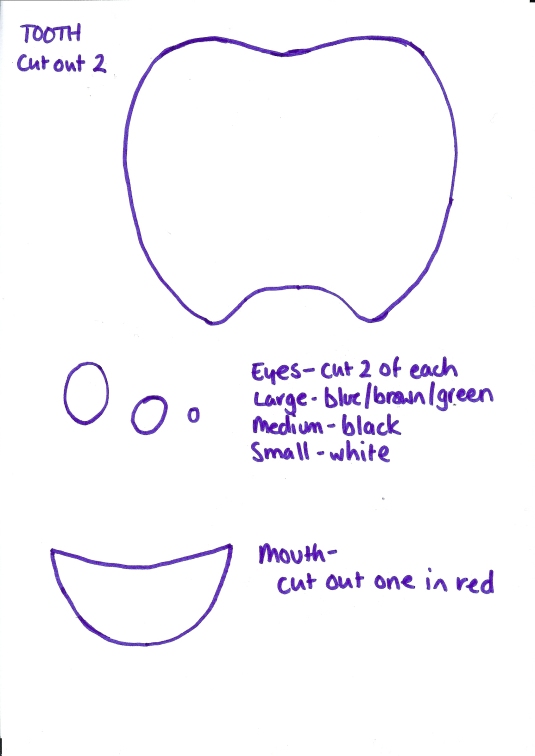
Copy and paste the picture below into something like word so you can print, the pic should be A4 sized to get a hanger the same size as mine. To do this you will have to reduce the margins and stretch the picture to fill the page.

You will need – Felt in white, eye colour of choice, black and red. Ribbon for hanging and toy stuffing (I cant find any near where I live so I bought a cheap cuchion and ripped it open).

tooth hanger

Instructions –

Cut out all pieces according to template (you dont really have to cut round the little white bit for the eye, thats just so you remember to make one). I used a simple running stitch to do all the sewing and doubled up the thread. I also used thread in the same colour as the piece I was sewing but you can get a nice effect using a contrasting colour.

Start with the eyes. Sew the white bit to the black bit then the black bit to the blue/green/brown/whatever colour eyes you want bit.

Position the eyes and the mouth on one of the tooth pieces and make sure you are happy. Pin them into position and stitch them on, you only stitch the bottom half of the mouth on as this is the pocket for teeth and money.

Then put the two white bits together. Put the ribbon in place NOW or you will end up cursing and unpicking to get back to that bit later (or perhaps thats just me).

Sew almost all the way round the tooth shape making sure the ribbon is very secure, I did 3 lines of stitching as small children have a habit of yanking things too hard if there is something they want inside.

When you have just a couple of inches left to stitch, stuff the tooth shape lightly. Then finish off the stitching and tidy up the ends of the thread.

Voila!

www.gigglinggoblin.co.uk

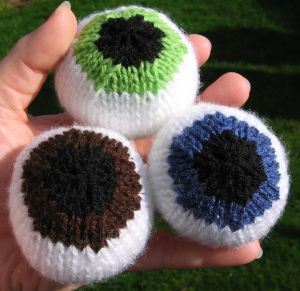
Knitted eyeball juggling balls

Stuff them with toy or cushion stuffing to make them nice and squishy soft, add a bag of dried lentils to weight them down or stuff them with cat nip for your favourite moggy

eyeballs

k – knit

p – purl

kfb – knit frotn & back. Knit the stitch as normal but do not slide it off the left needle. Bring the right needle round to the back of the stitch and knit it again, then slide it off. You have created 2 stitches from one.

k2tog – knit 2 together, put the right needle through 2 stitches at the same time and knit as normal.

p2tog – as k2tog put purl

st st – stocking stitch (knit one rowm purl one row)

st – stitch

Pattern- 4mm needles (US sizee 6) and dk yarn

Cast on 6 st  using white

Kfb to end (12)

[K1, kfb] to end (18)

[Kfb, p2] to end (24)

K1 row

[Kfb, p3] to end (30)

K 1 row

[Kfb, p4] to end(36)

st st 7 rows

[P2tog, p4] to end (30)

Change to colour for iris

K 1 row

[P2tog, p3] to end (24)

K1 row

Change to black for pupil

[P2tog, P2] to end (18)

[K1, k2tog] to end (12)

P2tog to end (6)

Thread yarn through remaining stitches and fasten off. Use tail ends in correct colours to sew down the side, remember to stuff before you close it up.

www.gigglinggoblin.co.uk

Father Ted-dy Bear! Knitting Pattern

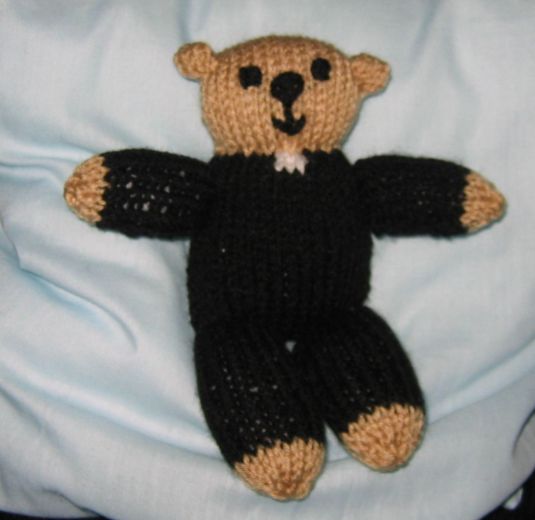
My other half is a huge fan of Father Ted so I made him his very own Ted!

I used dk yarn and 4mm needles but as you can see by the photo it isnt a very tight knit fabric so you could try with 3.25 mm needles if you prefer. Only needs scraps of yarn and takes a couple of hours. You need black, white and bear colour to make a priest bear but  you could just use bear colour if you want a plain ted, you also need scraps for the face which has been stitched on. He is a great size for toddlers to hold and there are no dangerous bits for them to pull off and swallow.

fatherteddybear

Abbreviations

St st – stocking stitch (K 1 row, P 1 row)

Kfb – increase 1 by knitting into front and back of stitch

K – knit

P – purl

K2tog / P2tog – decrease by knitting / purling 2 together

Body/ Head

Cast on 17 st in black.

St st 20 rows.

Row 21 – K7 black, K3 white, K7 black

Row 22 – P7 black, P3 white, P7 black

Change to bear colour for head

St st 10 rows

Kfb, K1, Kfb, K to last 3, Kfb, K1, Kfb

St st 4 rows

P2tog, P1, P2tog, P to last 5, P2tog, P1, P2tog

St st 10 rows

Change to black

St st 22 rows

Cast off.

Arms (make 2)

Cast on 12 in black.

St st 14 rows

Change to bear colour.

St st 3 rows

P2tog to end

Thread yarn through remaining stitches and fasten off.

Legs (make 2)

Cast on 16 in black

St st 18 rows

Change to bear colour

St st 4 rows

K2tog to end

Thread yarn through remaining st, fasten off

Making up

Body –

Fold body piece in half so black bits are together. Sew all around black.

Sew up one side of head.

Stuff body.

Work a running stitch in bear colour around the first row of head. Pull tight to form shape of neck and fasten off.

Sew on face details, stuff head.

Sew up other side of head.

For ears, work a running stitch around the increase st. Pull tight and ears will form. Fasten off securely.

Arms and legs –

Fold in half and sew up side. Stuff firmly, sew up end.

Attach to body.

Voila!

www.gigglinggoblin.co.uk

Chunky Wrist Warmers Free Knitting Pattern!

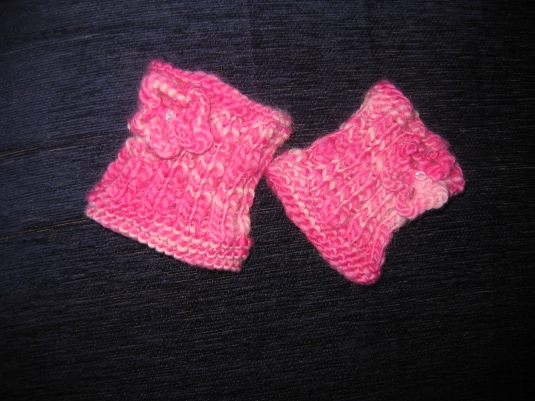
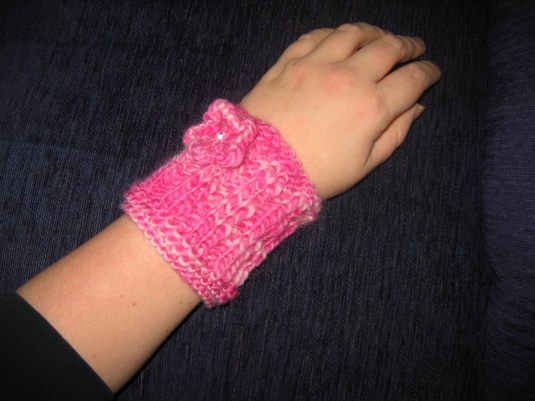
Was talking to my gran the other day and she was saying she doesnt like gloves because she cant grip properly when wearing them (she has a walking aid). I had just bought some Debbie Bliss Soho wool and thought these would make a nice present. They are really simple and knit up quickly. I used less than one skein using 5.5mm needles.

img_8561

Cast on 36 stitches

Knit 4 rows

Double rib (knit 2, purl 2) for 16 rows or as many as needed to reach desired length if you want them long. These come to 10cm with the edging.

Knit 4 rows

Cast off.

Sew up side seam, weave in ends.

For the flower (not too easy to see on the above pic!)

Cast on 31 st

[Knit 1, cast off 5] repeat to end

In case this isnt clear you should have 6 st left on needle, the first, the last and 4 inbetween, each spaced out by the cast off stitches.

Thread yarn through remaining st, pull the yarn into a circle. Making the middle tight will create the petals. Fasten off, use end to sew to wrist warmers. I have added a bead in the middle for a touch of sparkle. This was done with thread, not yarn as the yarn is too thick to go through the bead.

img_8565

I would love to see some pics if you use the pattern, please link to your blog if you put photos up so I can have a look!

www.gigglinggoblin.co.uk